That time of year has come where you start to question “when does spring cleaning start?” Even more than that, you’re probably already freaking out with everything you need to get done. There’s a whole set of “Where do I start? What do I need to do? How do I deep clean my home?” questions.
Let’s not panic, people!
In my experience, you can either go with a 30-day spring cleaning checklist, or prepare yourself to clean the whole house in a day. There’s also a third option here that’s kind of a middle ground: take one weekend of your month to do the spring cleaning!
Particularly, I prefer to take the weekend, that way I don’t feel overwhelmed like I need to rush things to complete all tasks in one day. Though I do like the 30-day checklist, it seems that when day 30 comes, the first things on the list I did are not clean anymore, and then I enter this infinite cycle of never stopping the cleaning process.

Either way,
Once you decide what’s best for you, you’ll need to make a schedule! Highly recommended that you prepare a checklist room by room, specially if you’re still new at the whole spring cleaning business. One room at a time helps keep you focused and the satisfaction of seeing things actually getting done will start sooner!
Consider getting help from family, friends, or even your kids if they’re old enough for it. Nobody can do it all alone, but everyone can do something! Put together the best cleaning playlist with upbeat music, all the supplies you’ll need, and make sure to have meals that are easy to prepare (or even prepare a couple of meals beforehand and then just heat up when it’s time to eat).

One more thing before getting to the spring cleaning tips - you’ll need these things before you get started:
- Rubber gloves
- Masks
- Hairnets
- Scarves
This is just a simple list that can help avoid skin irritations and allergic reactions you may experience from cleaning products. Be safe above all!
“Do it now. Sometimes later becomes never.” - Unknown
First of all: De-clutter

There’s no talking about cleaning without mentioning de-cluttering too. We could give it a try, but I’m sure that wouldn’t be as efficient. De-cluttering should be the first thing you do before actually start spring cleaning because it will reveal spaces that you might not see if you skipped this step.
Laundry

Start by going into each room of the house and collecting all dirty clothes, then place them in the washing machine while you go back up and start cleaning! Set a timer so the clothes don’t end up all day in the machine. That way you even can take a small break to drink a cup of coffee while you hang the clothes. It’s good to keep focused, but you’d be surprised at the difference these little 10 minute breaks can make!
You could also:
Start by washing blankets, throw covers, and pillows, that way they’d have the whole day to dry in the sun. But where to start is really a matter of personal preference - I, for example, prefer to leave the blankets, throws, and pillows for the last day of cleaning. That’s because the last day is a bit lighter on tasks, and I can keep an eye on the pillows to rotate them when needed.
Work from Top to Bottom

Work from top to bottom, I mean like, really from the top: start by cleaning the ceiling, ceiling fans, and light fixtures. Then you can move down to walls, windows, and doors - but don’t worry too much, you won’t need to wash and spend a ton of time on these, simply wipe down the walls and blinds with a damp cloth.
For the actual window, a steam cleaner and squeegee can do wonders! Or, you can simply hire someone to do that for you while you focus on the rest of the house!
Set a Timer

Set a timer (or alarm clock) to keep you aware of how much time you spend on each task. If you’ve started your bullet journal already, this is a great page idea to try: make a tracker to write down your times! This will be helpful for next time you need cleaning because you’ll know how to prepare and organize better.
Remove Linens

Removing linens to wash, maybe replacing if necessary, is an important step. These include:
- Curtains
- Tablecloths
- Sheets
- Pillow covers
- Throw covers
They tend to build up a lot of dust throughout winter, so this can be one of your first tasks. That will prevent the dust from getting onto something you’d already cleaned before removing the linens.
Flooring Hack

Floors are a big deal and you know it! A vacuum cleaner usually does the trick, unless you have a hardwood flooring. In that case, a microfiber mop and a spray bottle filled with water will work just fine - spray the water directly onto the floor and mop away! This will make it look like you washed the floor without actually needing to get down and scrubbing.
Separate Everything Into Boxes
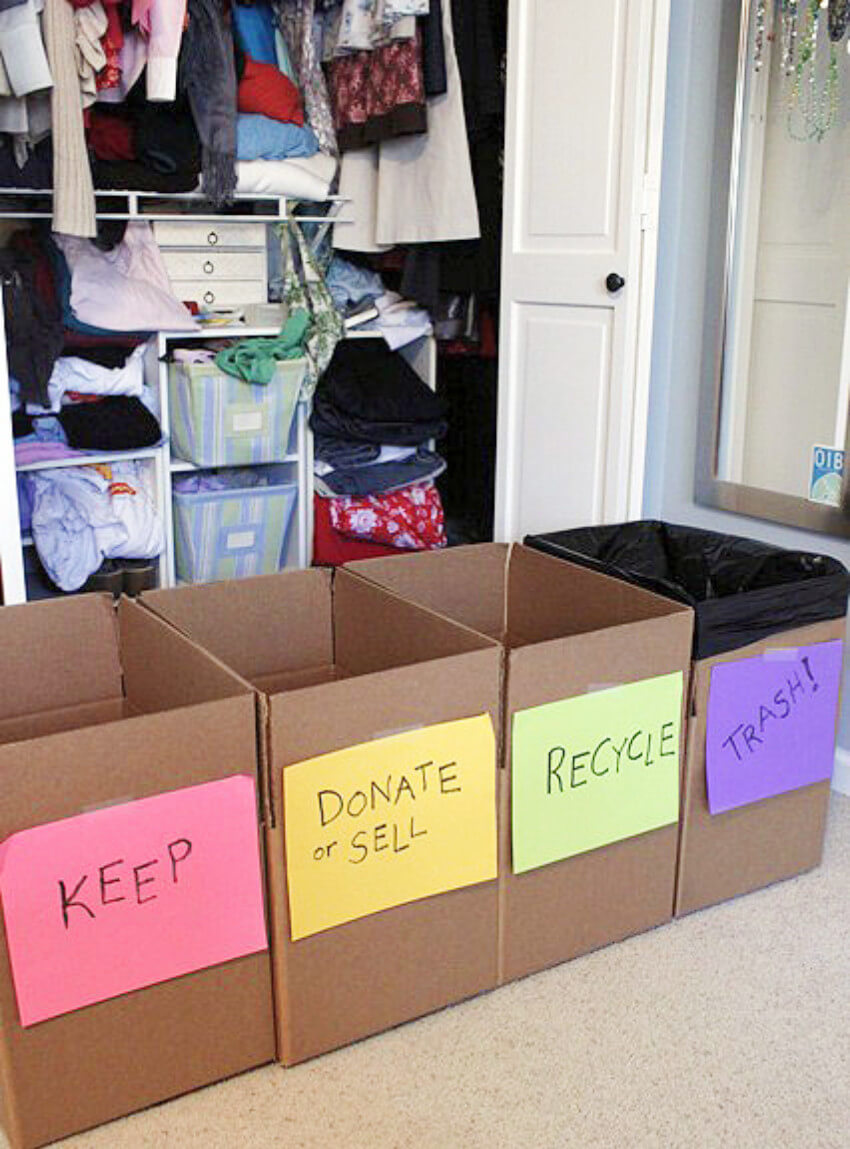
For each room that you go through, take four boxes with you. You’ll take everything out and off closets and shelves, and then you start separating:
- Garbage/Recycle (you can use two separate boxes for these if you want)
- Donations
- Storage
- Keep
This way you can already get rid of garbage, take the donations box to your car, and the storage box to the “storage room.” The part you’re actually going to keep in the room, leave it in the hallway until you’re done cleaning the room in question. Once it’s all set, bring the box in and organize!
Remember: Air Quality

Winter is the time where we don’t usually keep the windows open, the house doesn’t get enough sun, and we don’t go out that much, which ends up making our home dirtier, the house doesn’t ventilate enough, and the air quality goes down!
Checking your ACs, getting the ducts cleaned, and removing pet fur from carpets and couches: these are all examples of how to improve the air quality at home. It’s really important since it helps avoid allergies and can reduce asthma attacks!
Tip: a rubber glove can do really well the job of getting rid of pet fur!
General Household Tasks

There are a couple of things that don’t fit into any room-by-room checklist, but that are still really important to get done. Such as:
- Changing the smoke detectors batteries
- Getting rid of extra remotes
- Clean the remotes you use and change their batteries
Give Your Fridge Full Attention

This task goes along the kitchen cleaning, however, the fridge itself need your full attention. You’ll need to clear out the entire thing, seriously: take everything out! Start by checking expiration dates and already throwing out everything that has gone bad.
Done doing that? Good!
Now, before putting back the good stuff, spray a mix of water and vinegar inside the fridge to wipe it out. You can also take out the shelves and wash them with water and soap. Once that’s settled, start putting your food back:
- Condiments on the door
- Veggies and fruits in the bottom drawer
- Perishable items on the middle shelf
Room by Room Checklist
So, with all this talk about going one room at a time, I couldn’t leave this article without a checklist for you guys, right? I was going to make my own checklist to share with you, but this spring cleaning checklist printable from Sylvane is so direct, simple, and organized that I had to share it instead.
Check it out:

Spring cleaning can be a dread for folks with busy schedules, so you can always get a free quote from a professional service to help you out! I’d love to hear your own spring cleaning tips, our Facebook page is always open to comments!


