Window treatments are supposed to make a window gorgeous, but they can be useful and bring privacy as well! There’s no doubt that buying curtains and blinds can be more practical than making your own shade at home. However, this is a nice DIY project that anyone can enjoy while also making a shade for your window that won’t block out all the natural light! Whatever room you’re making these privacy laces for, it’ll be a lovely addition that helps keep privacy and comfort at the same time.
“There is nothing like staying at home for real comfort.” - Jane Austen

Step 1: Gather the Materials

This project keeps getting better! It’s super easy and incredibly cost-effective. So, these are the supplies you’ll need:
- Water (boiling and room temperature)
- Cornstarch
- Lace (window size)
- Standard paintbrush
- Crafting scissors (super sharp ones!)
- Measuring tape
You should definitely clean your windows before starting your project. Check out the best local companies to help you out!
Step 2: Cut the Shape

Start off by measuring the length and width of your window, then cut the lace accordingly.
Before moving on to the next step:
Make sure to test the lace against your window and see if it needs any adjustment.
Step 3: Prepare the “Glue”

To prepare this past-like glue, you’ll first need to take a bowl and dissolve the cornstarch in room temperature water. While dissolving, boil some water to add to the mixture as well. Stir everything together until you have a thin, smooth texture - similar to glue.
The measures for this recipe are:
- ¼ cup room temperature water
- 2 cups boiled water
- 2 tablespoons cornstarch
Note: Keep an eye on the texture when mixing the boiled water because you might need to add a bit more cornstarch.
Step 4: Seal the Lace
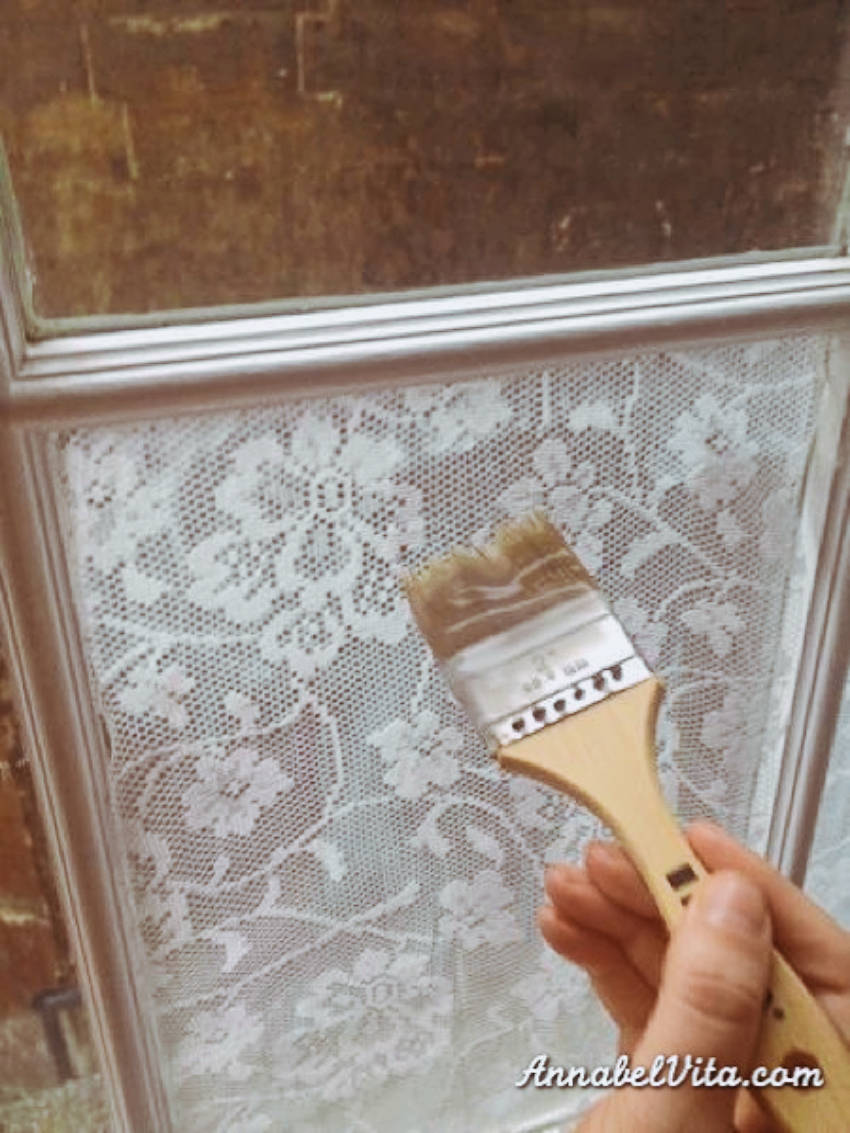
The last step to have your lace privacy ready is to seal it with your glue. Place the lace over the window and use the paintbrush to fully cover it with the cornstarch mixture.
How To Remove Your Privacy Lace

You’d think this is a hard thing to do, but in reality, it’s so easy!
All you need is:
- Warm water
- Soap
It will wash the lace off and leave no marks on your window. In case you still have any doubts, watch this video from Coral TV to find out how it’s done.
Bonus Inspiration
Privacy for Big Bathroom Windows

Moira, from Crafty Moira, had this huge window on her apartment and it was kind of uncomfortable. So, she decided to do a DIY home improvement project with this awesome project and the results are beautiful!
Privacy for Front Entrance Door

If you have these glass windows in the front of your home, it has probably already happened that someone gave a quick pick inside when you took a little while to get to the door. In order to avoid that, the DIY privacy lace window is the perfect project for you!
Decor for Cabinets with Glass Doors

Or if you like the idea of using lace, you can also try a DIY decor project! The one with white lace from the photo above looks gorgeous and classy!
Pink Lace for Window Decor

In addition to using lace, adding a bit of color will do wonders for your bathroom (or any other room). Just make sure the lace color complements the decor of the room.
Privacy with Style

Isn’t this just beautiful? Instead of window tinting, you can try this DIY lace window treatment. This growing trend will soon get everyone’s attention!
Related:
- The Beginner’s Guide on How to Paint Furniture
- 11 Unique Entryway Makeover Ideas That Will Amaze You
- How to Achieve the $0 Bedroom Makeover Step-by-step
- How to Fold Fitted Sheets
- 8 Things Every Small Bathroom Needs
Are you planning to DIY your own privacy lace window? Let us know what you think in the comments below and discover more DIY & Decor Ideas!


